Learning how to calibrate a kitchen thermometer is one of the easiest ways to improve your cooking accuracy and keep your food safe. Whether you use a digital probe or a traditional dial thermometer, regular calibration ensures your readings are spot-on. This guide walks you through two simple methods, common mistakes, and maintenance tips that every home cook should know.
Have you ever wondered if the thermometer sitting in your kitchen drawer is actually giving you the right temperature? It is a question more people should ask. How to calibrate a kitchen thermometer is a skill that every home cook, baker, and griller should have in their toolbox.
Your thermometer is the single most important tool for food safety and cooking precision. But over time, sensors can drift. A thermometer that reads two degrees off might not sound like much, but that small error can mean the difference between perfectly cooked chicken and a risky meal. Calibrating a kitchen thermometer takes just a few minutes, and it costs nothing.
In this guide, we will walk you through everything you need to know. From the simple ice water method to the boiling water test, you will learn how to check and adjust your thermometer with confidence. We will also cover common mistakes, maintenance tips, and when it is time to replace your tool altogether. By the end, you will never second-guess your temperature readings again.
Key Takeaways
- Calibration matters: An uncalibrated thermometer can lead to undercooked or overcooked food, affecting taste and safety.
- Two easy methods: The ice water test and boiling water test are the most reliable ways to check accuracy at home.
- Do it regularly: Calibrate your thermometer before important meals, after drops or impacts, and every few months.
- Know your type: Digital, analog, and infrared thermometers each require slightly different calibration approaches.
- Replace when needed: No amount of calibration fixes a broken sensor. Know the signs it is time for a new one.
- Altitude affects results: Boiling point changes with elevation, so adjust your expectations accordingly.
- Small adjustments make big differences: Even a 2-degree error can impact food safety and cooking quality.
📑 Table of Contents
- Why Calibrating Your Thermometer Matters
- The Ice Water Method: Step by Step
- The Boiling Water Method: Testing at the Other Extreme
- Calibrating Different Types of Thermometers
- When to Replace Your Thermometer
- Quick Tips for Maintaining Thermometer Accuracy
- Common Mistakes People Make When Calibrating
- The Role of Thermometers in Food Safety
- Key Takeaways
- Conclusion
Why Calibrating Your Thermometer Matters
Temperature accuracy is not just about getting your steak to the perfect level of doneness. It is about food safety, consistency, and trust in your own cooking. When your thermometer is off, you are essentially guessing. And guessing with food temperatures can lead to serious problems.
The Hidden Danger of Inaccurate Readings
Foodborne illness is a real risk in any kitchen. Bacteria like salmonella and E. coli thrive in the “danger zone” between 40 and 140 degrees Fahrenheit. If your thermometer reads low, you might think your meat has reached a safe temperature when it has not. On the flip side, an overreading thermometer can cause you to overcook food, drying out expensive cuts of meat and ruining meals you worked hard to prepare.
The United States Department of Agriculture recommends specific internal temperatures for different proteins. For example, poultry should reach 165 degrees Fahrenheit, ground meat should hit 160 degrees, and steaks are safe at 145 degrees. Even a small sensor drift can throw off these critical thresholds. Calibrating a kitchen thermometer ensures that the numbers on your display match reality.
How Often Should You Calibrate?
Many people make the mistake of calibrating once and forgetting about it. The truth is that thermometers need regular attention. Here are some guidelines to follow:
- Before every big cook: If you are hosting a holiday dinner or grilling for guests, check your thermometer first.
- After any physical impact: Dropping a thermometer can knock the sensor out of alignment.
- Every two to three months: Regular home use causes gradual sensor drift over time.
- When switching between extreme temperatures: Going from a freezer to a hot oven can stress the probe.
- Whenever results seem off: If your food consistently cooks faster or slower than expected, recalibrate.
Think of calibration like sharpening a knife. You do it regularly to keep things working at their best. A well-maintained thermometer gives you reliable results meal after meal.
The Ice Water Method: Step by Step
The ice water bath test is the most popular and reliable way to calibrate a kitchen thermometer. It is simple, fast, and requires nothing more than ice, water, and a few minutes of your time. This method checks whether your thermometer correctly reads the freezing point of water, which is 32 degrees Fahrenheit at sea level.
What You Need for the Ice Water Test
Gather these items before you start:
- A tall glass or container
- Crushed or cubed ice
- Cold tap water
- Your thermometer (digital or analog)
- A clean cloth or paper towel
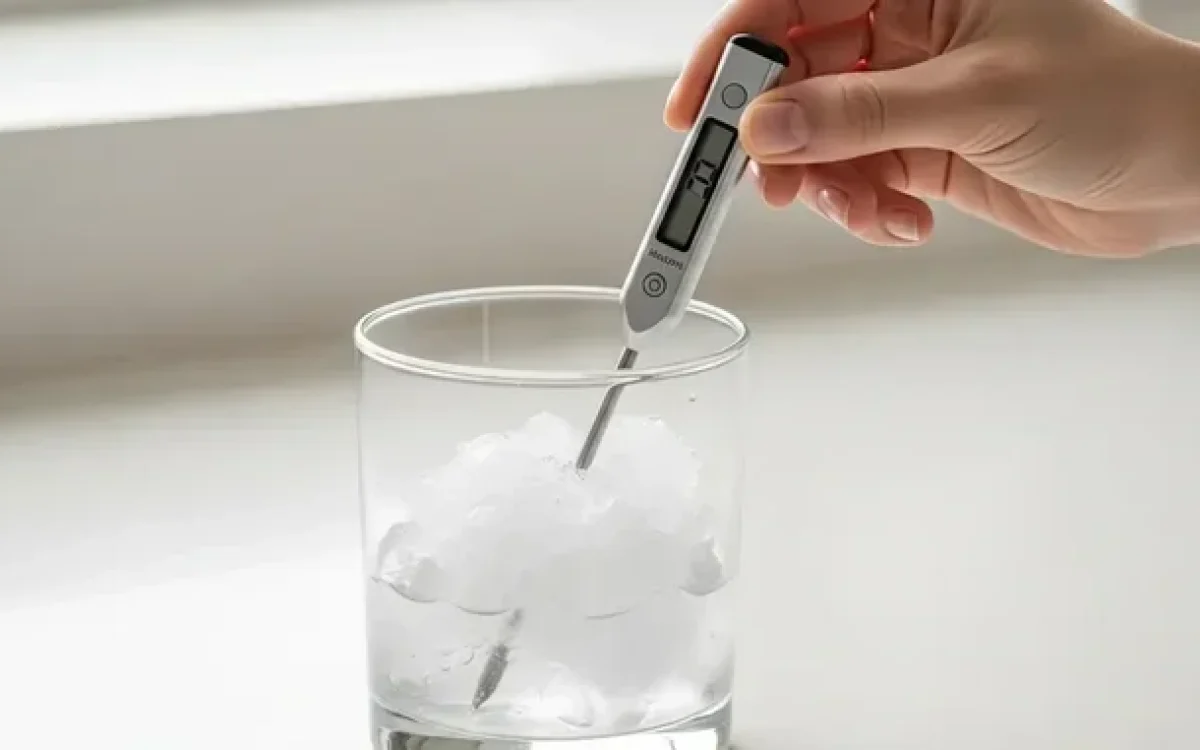
Using crushed ice instead of cubes gives you better thermal contact with the water. The more ice surface area touching the water, the more accurate your test environment becomes. Fill the glass about three-quarters full with ice, then add cold water until the glass is nearly full. Stir the mixture gently and let it sit for about 30 seconds.
Step-by-Step Ice Water Calibration
Now that your ice bath is ready, follow these steps carefully:
- Stir the ice water mixture gently with your thermometer probe. Do not let the probe touch the sides or bottom of the glass. You want the sensor to sit in the center of the water.
- Wait for the reading to stabilize. Digital thermometers usually take 15 to 30 seconds. Analog thermometers may take a bit longer.
- Check the reading. It should show exactly 32 degrees Fahrenheit. Some digital models may display 32.0 or 31.9, which is perfectly fine.
- If the reading is off, note the difference. If it reads 34 degrees, you have a 2-degree offset. If it reads 30 degrees, you have a negative 2-degree offset.
- Adjust the thermometer. Many digital models have a calibration screw or button. Consult your user manual for specific instructions on how to reset the offset.
- Repeat the test. After adjusting, place the probe back in the ice water to confirm the reading is now 32 degrees.
This method works beautifully for most kitchen thermometers. It is the go-to test recommended by professional chefs and food safety experts alike. The beauty of the ice water method is that it gives you a known reference point. Water freezes at 32 degrees, and that number does not change.
Common Mistakes During the Ice Water Test
Even a simple test can go wrong if you are not careful. Here are pitfalls to watch out for:
- Using warm water: The water must be cold. Warm water will give you a false reading above 32 degrees.
- Not enough ice: Too little ice means the water temperature may be above freezing. Use plenty of ice for an accurate test environment.
- Touching the glass walls: The probe should float freely in the water. Contact with the glass can give you a warmer reading.
- Reading too quickly: Give the sensor time to adjust. Rushing the reading leads to inaccurate results.
- Ignoring the offset: Some people notice a wrong reading and do nothing about it. Always adjust if the number is off.
Taking your time with the ice water method pays off. A careful calibration here sets the foundation for accurate readings across all your cooking tasks.
The Boiling Water Method: Testing at the Other Extreme
The boiling water test is the second standard method for thermometer calibration. While the ice water test checks the low end of the scale, the boiling water test checks the high end. Together, these two tests give you a solid range of accuracy across your thermometer’s entire scale.
How to Test with Boiling Water
Here is how to perform the boiling water test safely and accurately:
- Bring a pot of water to a rolling boil. Use fresh tap water and a medium-sized pot. A vigorous, continuous boil is what you want, not a gentle simmer.
- Insert the probe into the boiling water. Just like with the ice bath, avoid touching the bottom or sides of the pot. The probe should be fully submerged in the moving steam and water.
- Wait for the reading to stabilize. This may take 30 to 60 seconds depending on your thermometer type.
- Check the reading. At sea level, water boils at 212 degrees Fahrenheit. Your thermometer should reflect this.
- Adjust if necessary. Use the calibration function to correct any offset, just as you did with the ice water test.
- Verify the adjustment. Remove the probe, let it cool slightly, and test again to confirm accuracy.
The boiling water test is especially useful for people who do a lot of candy-making, deep frying, or high-heat cooking. These applications demand precise temperature control, and even a small error can ruin a batch of sugar work or cause oil to become dangerously hot.
Why Altitude Affects Your Boiling Point
Here is something many people do not realize. Water does not always boil at 212 degrees Fahrenheit. The boiling point drops as you gain altitude. If you live in a mountainous area, your water may boil at 205 degrees or even lower, depending on how high you are above sea level.
For example, in Denver, Colorado, which sits about a mile above sea level, water boils at roughly 203 degrees Fahrenheit. If you use the standard 212-degree reference without adjusting, your calibration will be off. You can find online calculators that tell you the exact boiling point for your elevation. Use that number instead of 212 when performing your boiling water test.
This is a crucial detail that separates a good calibration from a great one. Always account for your local altitude when using the boiling water method to calibrate a kitchen thermometer.
Calibrating Different Types of Thermometers
Not all thermometers are the same. The type of thermometer you own affects how you should approach calibration. Let us break down the differences between the most common kitchen thermometer types and how to handle each one.
Digital Thermometers
Digital instant-read thermometers are the most popular choice for home cooks today. They offer fast readings, clear displays, and often include a calibration feature. Most digital models have a small reset button or a calibration screw hidden under the battery cap or the probe housing.
To calibrate a digital thermometer, you typically hold down a reset button while inserting the probe into the ice water bath. The display should then show 32 degrees once you release the button. Some higher-end models let you input a custom offset value through a menu screen. Always refer to your specific model’s manual for the exact steps.
One advantage of digital thermometers is that they are less prone to mechanical wear. The electronic sensor is sealed inside the probe, which protects it from moisture and physical damage. With proper care, a good digital thermometer can stay accurate for years.
Analog and Dial Thermometers
Older analog thermometers with a dial face work differently from digital models. Instead of pressing a button, you physically adjust the dial itself. Most analog thermometers have a small nut or calibration screw located right behind the dial face or at the base of the probe.
Here is how to adjust an analog thermometer:
- Insert the probe into the ice water bath. Wait for the dial to stop moving.
- Locate the calibration nut. It is usually a small hex nut beneath the dial or at the top of the probe shaft.
- Use a small wrench or pliers to gently turn the nut. Turning it clockwise or counterclockwise adjusts the reading.
- Turn the nut slowly. Small adjustments make a big difference. You want the dial to point exactly at 32 degrees.
- Test again. Remove the probe, let it settle, and recheck in the ice water.
Analog thermometers require a bit more patience during calibration, but they are incredibly durable. Many professional kitchens still rely on dial thermometers because they have no batteries and no electronic parts to fail. With regular calibration, an analog thermometer can serve you faithfully for decades.
Infrared Thermometers
Infrared thermometers measure surface temperature without contact. They are popular for checking the temperature of pans, oven walls, and grill grates. However, infrared thermometers cannot be calibrated the same way as probe thermometers because they measure emitted heat rather than conducting through a probe.
Some infrared models come with a calibration reference source, such as a blackbody calibration plate. If your infrared thermometer does not have this feature, you can compare its reading against a known-accurate probe thermometer placed on the same surface. This comparison method helps you identify if your infrared thermometer is reading consistently or if it needs professional recalibration or replacement.
When to Replace Your Thermometer
Sometimes calibration is not enough. A thermometer that is damaged, old, or has a failing sensor cannot be saved by adjustment alone. Knowing when to replace your tool is just as important as knowing how to calibrate it.
Here are clear signs that your thermometer has reached the end of its useful life:
- The reading never stabilizes: If the temperature keeps jumping or fluctuating even in a stable ice bath, the sensor may be failing.
- Cracked or damaged probe: A visibly broken probe allows moisture inside, which corrupts the readings.
- The display is unreadable: Faded numbers, flickering digits, or a blank screen signal electronic failure.
- Consistent errors after calibration: If you calibrate and the thermometer still reads more than 3 degrees off, the sensor is likely worn out.
- The battery dies frequently: Constant battery replacement can indicate internal corrosion or a dying circuit board.
- The thermometer is more than five years old: Even with good care, electronic sensors degrade over time. Consider replacing older units.
Replacing a thermometer is inexpensive compared to the cost of food waste or, worse, a foodborne illness. Keep a backup thermometer in your kitchen drawer so you are never left without a reliable temperature reference.
Quick Tips for Maintaining Thermometer Accuracy
Calibration is not the only thing you can do to keep your thermometer working well. Regular maintenance extends the life of your tool and keeps readings accurate between calibration sessions.
Here are some practical tips every cook should follow:
- Store your thermometer properly: Keep it in a protective case or sleeve when not in use. A storage case prevents accidental drops and probe damage.
- Clean the probe after every use: Wash the probe with warm soapy water and dry it thoroughly. Never submerge the entire digital thermometer in water unless it is specifically rated as waterproof.
- Avoid extreme shocks: Do not drop your thermometer or toss it into a drawer carelessly. Physical impacts are the leading cause of calibration drift.
- Check the battery regularly: Low battery power can cause inaccurate readings in digital models. Replace batteries at the first sign of a dim display.
- Use the right thermometer for the task: A meat thermometer is not the same as an oven thermometer. Using the right tool for the job ensures better results.
- Record your calibration dates: Write down when you last calibrated each thermometer. This simple habit helps you stay on top of maintenance.
These small habits add up to big improvements in kitchen accuracy. A well-cared-for thermometer is a reliable thermometer.
Common Mistakes People Make When Calibrating
Even experienced cooks sometimes make errors during calibration. Being aware of these mistakes helps you avoid them and get accurate results every time.
Skipping the calibration altogether. This is the most common mistake. Many people assume their thermometer is accurate because it is new. But factory settings can drift during shipping and storage. Always test before your first use.
Using the wrong reference temperature. Remember that the ice point is 32 degrees Fahrenheit and the boiling point is 212 degrees at sea level. Using an incorrect reference throws off your entire calibration.
Not stirring the ice water. A static ice bath can have temperature variations. Stirring ensures the water is uniformly cold and at the freezing point.
Rushing the process. Calibration requires patience. Wait for the reading to fully stabilize before making any adjustments. A few extra seconds of waiting can make a significant difference.
Forgetting about altitude. As we discussed, altitude changes the boiling point. Ignoring this factor leads to a false calibration on the high end of your thermometer’s range.
Never rechecking after adjustment. Always test again after making a calibration change. This confirms that the adjustment worked and your thermometer is now reading correctly.
Avoiding these common mistakes ensures that your calibration efforts actually produce accurate results. A careful approach to thermometer calibration pays dividends in every meal you cook.
The Role of Thermometers in Food Safety
Temperature control is the backbone of food safety in any kitchen. Harmful bacteria multiply rapidly in the temperature danger zone, which spans from 40 to 140 degrees Fahrenheit. A reliable thermometer helps you stay out of this danger zone or move through it quickly enough to prevent bacterial growth.
The FDA Food Code sets strict guidelines for internal cooking temperatures. Poultry, stuffed meats, and leftovers must reach 165 degrees Fahrenheit. Ground meats need 160 degrees. Fresh beef, pork, lamb, and veal are safe at 145 degrees followed by a three-minute rest. These numbers are not suggestions. They are scientifically proven thresholds that kill harmful pathogens.
When your thermometer is uncalibrated, you cannot trust these numbers. A probe that reads 3 degrees low means your chicken is actually at 162 degrees instead of 165. That 3-degree gap might seem small, but it could be the difference between safe food and a foodborne illness outbreak. This is why calibrating a kitchen thermometer is not just a cooking tip. It is a food safety practice.
Professional kitchens calibrate thermometers at the start of every shift. While home cooks do not need to be that rigorous, adopting a regular calibration habit dramatically improves your kitchen safety and cooking results.
Key Takeaways
- Calibration is essential: An uncalibrated thermometer can give false readings that compromise food safety and cooking quality.
- Use the ice water method: This is the simplest and most reliable way to check your thermometer at the freezing point of 32 degrees Fahrenheit.
- Use the boiling water method: This checks the high end of your thermometer’s range, but remember to adjust for your altitude.
- Know your thermometer type: Digital, analog, and infrared thermometers each require different calibration techniques.
- Calibrate regularly: Before big cooks, after drops, and every few months to maintain accuracy.
- Replace when necessary: A damaged or worn-out thermometer cannot be fixed by calibration alone.
- Maintain your tools: Proper storage, cleaning, and battery management keep your thermometer performing at its best.
Conclusion
How to calibrate a kitchen thermometer is a simple yet powerful skill that transforms your cooking. Whether you prefer the ice water method or the boiling water test, the process is straightforward and takes only minutes. Regular calibration ensures that your temperature readings are accurate, your food is safe, and your meals turn out perfectly every time.
Do not wait until a meal goes wrong to check your thermometer. Make calibration a routine part of your kitchen preparation. A few minutes of effort now saves you from wasted ingredients, disappointing meals, and potential food safety risks later.
Your kitchen thermometer is a workhorse. It deserves the same care and attention you give to your other cooking tools. Keep it clean, store it safely, calibrate it regularly, and replace it when the time comes. With a well-maintained thermometer, you can cook with confidence and trust every temperature reading on your display.
Start today. Grab your ice, fill a glass with water, and test your thermometer. You will be amazed at how a simple five-minute task can make such a big difference in your kitchen. Calibrating a kitchen thermometer is one of the best investments you can make in your cooking skills and your family’s health.
Frequently Asked Questions
Can you calibrate a kitchen thermometer in the freezer?
Yes, you can use a freezer as an alternative to the ice water method. Place your thermometer in a cup of alcohol or vegetable oil and put it in the freezer for at least 30 minutes. The freezer should read 0 degrees Fahrenheit. However, the ice water method is more reliable because it provides a precise and consistent reference point. The freezer temperature can fluctuate, making it a less accurate calibration environment.
What is the difference between calibration and accuracy?
Calibration is the process of adjusting your thermometer to match a known reference temperature. Accuracy refers to how close your thermometer’s readings are to the true temperature. A thermometer can be accurate without being calibrated if it has not drifted, but calibration is the process that restores accuracy when drift occurs. Regular calibration keeps your thermometer accurate over time.
Do I need to calibrate a new thermometer?
Absolutely. Even brand-new thermometers can be slightly off from the factory. Shipping and handling can affect the sensor alignment. Always perform a quick ice water test with a new thermometer before your first use. This simple step takes less than two minutes and ensures you start with accurate readings from day one.
Can you calibrate a wireless or smart thermometer?
Most wireless and smart thermometers can be calibrated using the same ice water or boiling water methods as traditional probes. Check your manufacturer’s instructions, as some smart thermometers have a dedicated calibration mode in their companion app. The process is usually just as simple as pressing a button or entering a calibration offset value through the app interface.
Why does my thermometer give different readings in ice water and boiling water?
If your thermometer reads correctly at 32 degrees in ice water but gives an off reading in boiling water, the high-end sensor may be drifting. This can happen due to repeated exposure to high heat or physical damage. A consistent offset at both the low and high ends usually indicates a calibration issue that can be fixed. If the readings are inconsistent, the sensor may be failing and the thermometer might need replacement.
How long does a kitchen thermometer last before it needs replacing?
A well-maintained kitchen thermometer can last anywhere from three to five years with regular use. Digital thermometers tend to have a shorter lifespan than analog models because of their electronic components. If you notice persistent errors even after calibration, or if the probe shows physical damage, it is time to invest in a new thermometer. Food safety is not worth the risk of using a faulty tool.