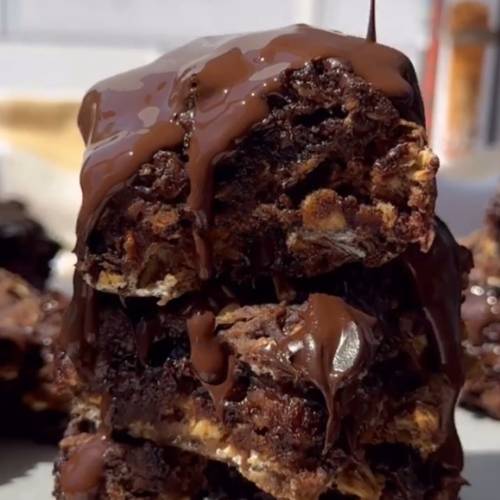
Who else loves chocolate and peanut butter together? Well, get ready to bake something super tasty! These Chocolate Peanut Butter Oatmeal Bars are soft, chewy, and packed with melty chocolate chips and creamy peanut butter flavor. Plus, they’re gluten-free, which makes them perfect for everyone to enjoy. They’re super easy to make, even if you’ve never baked before!
Method
Mix It All Up
Start by grabbing a large mixing bowl. Into this bowl, add your dry ingredients: 1 cup of old-fashioned rolled oats, 1 cup of gluten-free all-purpose flour, 1 teaspoon of baking soda, and 2/3 cup of brown sugar. Next, add in the 3/4 cup of chocolate peanut butter powder (such as @pbfit), 2 teaspoons of vanilla extract, and 1/2 cup of your preferred milk. Stir everything together until all the ingredients are well combined and you get a thick, slightly sticky batter. It may take a bit of elbow grease, but don’t worry it will come together nicely!
Add the Chocolate Chips
Once your batter is evenly mixed, it’s time to fold in the chocolate goodness. Gently add 1 cup of dark chocolate chips into the bowl. Use a spatula or large spoon to fold them into the batter. Folding means scooping from the bottom and lifting the batter over the chips, repeating the motion until the chips are spread throughout. This keeps the chips whole and evenly mixed without overworking the dough.
Prep the Pan
Now, prepare your 8×8 inch baking pan by lining it with parchment paper. Make sure the paper covers the bottom and sides, leaving a bit of overhang for easy removal later. This step helps prevent sticking and makes cleanup super easy. Pour your thick batter into the lined pan and use your spatula to spread it out evenly into all the corners. The top should be smooth and level for even baking.
Bake Time!
Preheat your oven to 350°F (175°C) before you start baking. Once it’s ready, place your filled baking pan in the center of the oven. Bake the bars for about 20 minutes. Keep an eye on them toward the end oven times can vary! To check if they’re done, insert a toothpick into the center. If it comes out clean or with just a few moist crumbs, your bars are ready.
Finishing Touch
As soon as the bars come out of the oven, while they’re still warm, sprinkle some extra chocolate chips or chunks on top. The heat will slightly melt the chocolate, giving you a gooey, glossy finish that looks amazing and tastes even better.
Cool & Slice
Let the bars cool completely in the pan before slicing. This part is important cutting too soon might make them crumble or fall apart. Once cool, use the parchment paper to lift the entire block out of the pan. Place it on a cutting board and slice into 9 even squares. Now they’re ready to serve or store (if you can resist eating them all right away!).
Necessary Tools
Before we get started, grab these kitchen tools:
- 1 large mixing bowl
- Measuring cups and spoons
- Mixing spoon or spatula
- 8×8 inch baking pan
- Parchment paper
- Toothpick (for checking if it’s done!)
- Oven mitts (because safety first!)
Peanut Butter Banana Muffins Sweet, Soft & So Simple!
Cuisine: AmericanDifficulty: Easy9
servings10
minutes20
minutes30
minutesIngredients
Here’s what you need to make these yummy bars:
1 cup old-fashioned rolled oats
1 cup gluten-free all-purpose flour
1 tsp baking soda
2/3 cup brown sugar
3/4 cup chocolate peanut butter powder (like @pbfit)
2 tsp vanilla extract
1/2 cup milk of your choice (almond, oat, dairy—your pick!)
1 cup dark chocolate chips
Extra chocolate for topping (optional, but awesome!)
Directions
- Let’s get baking!
Mix it all up!
In your big bowl, mix the oats, flour, baking soda, brown sugar, chocolate peanut butter powder, vanilla, and milk. Stir everything together until it forms a thick batter. - Add the chocolate chips.
Fold in the dark chocolate chips. This just means gently mixing them into the batter without squishing them too much. - Prep the pan.
Line your 8×8 pan with parchment paper (this helps stop the bars from sticking). Pour the batter into the pan and smooth it out evenly. - Bake time!
Pop the pan in the oven and bake at 350°F for about 20 minutes. Check with a toothpick if it comes out clean, they’re ready! - Finishing touch.
Take them out and sprinkle extra chocolate on top while they’re still warm, so it melts a little. Yum! - Cool & slice.
Let the bars cool before slicing them into 9 squares.
Notes
- Don’t overmix the batter! It can make the bars tough instead of soft and chewy.
- Make sure your oats are old-fashioned rolled oats not quick oats or steel-cut oats.
- Let the bars cool before slicing or they might fall apart. Patience pays off!


Serving Suggestions
- Pair a bar with a glass of cold milk for a perfect snack.
- Warm one up in the microwave and top with a scoop of vanilla ice cream.
- Pack one in your lunchbox or take it on a hike for an energy boost!
Fun Fact
Did you know peanut butter was first made in the 1800s? It was originally created as a soft food for people who had trouble chewing. Now we use it to make amazing desserts like these bars!
Conclusion
These Chocolate Peanut Butter Oatmeal Bars are a sweet treat you’ll want to make again and again. They’re cozy, chocolatey, and have just the right amount of chewiness. Plus, they’re easy enough for kids to help make and even easier to eat. Give them a try and let me know how they turn out in the comments!