If you’re looking for a delicious and healthy treat, this high protein fudge is exactly what you need. This easy no-bake recipe combines chocolate and peanut butter into a rich, satisfying snack that’s packed with protein. Whether you want a post-workout bite, an after-school snack, or a guilt-free dessert, this high protein fudge recipe is a simple way to enjoy something sweet while still supporting your fitness goals. It’s quick to make, freezer-friendly, and perfect for anyone who loves nutritious treats that actually taste indulgent.
Method
Chop-chop
Start by taking your favorite protein bars and chopping them into small, bite-sized pieces about 1/8 of their original size. These little chunks should be small enough to easily fit at the bottom of each section in your ice cube tray or mini muffin tin. Depending on the size of your tray or tin, you may need to adjust the size of each piece, but the goal is to have a solid protein-packed base for your fudge.
Tray time
Once your protein bar pieces are ready, place one piece into the bottom of each section of your tray. These pieces act like the chewy, flavorful core of each fudge bite. Make sure they’re sitting flat so the layers you’ll add on top will stay nice and even.
Peanut butter + honey = magic
In a separate bowl, combine the peanut butter and honey. Mix them really well until the texture becomes smooth and creamy. This sticky-sweet combo is what makes the fudge super soft and delicious. Once mixed, carefully spoon the mixture over each piece of protein bar in the tray. Try to fill each section just about halfway. This layer adds the richness and protein boost to your fudge, so make sure each portion is evenly coated.
Chocolate top coat!
Next, it’s time for the chocolate layer! Place your dark chocolate (chips or chopped) into a microwave-safe bowl or use a small saucepan if melting on the stove. Add in a tablespoon of oil or butter to help the chocolate melt more smoothly and pour easily. If using a microwave, heat in 30-second intervals, stirring in between, until the chocolate is completely melted and glossy. Carefully pour a layer of melted chocolate over each section, making sure it covers the peanut butter layer fully. This top layer will harden into a fudgy shell once frozen.
Finishing touch
Before freezing, add a tiny pinch of flaky sea salt on top of each chocolate layer. This step is optional, but it adds a delightful contrast to the sweetness and gives your fudge a gourmet, sweet-and-salty twist that’s absolutely worth trying.
Freeze
Finally, place the tray into the freezer and let it sit undisturbed for at least 2 hours. This gives all the layers time to set completely and hold their shape. Once fully frozen, you can pop each piece out of the tray. If you’re using a silicone mold, they’ll come out especially easily. Now your high protein fudge bites are ready to enjoy!
Necessary Tools
- Ice cube tray or mini muffin tin
- Microwave-safe bowl or small pot
- Spoon or small spatula
- Knife (to chop up the protein bars)
- Freezer space
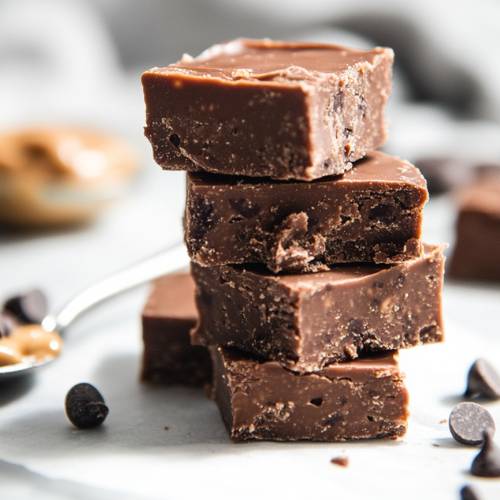
High Protein Fudge (Easy No-Bake Treat!)
Cuisine: AmericanDifficulty: Easy12
servings10
minutes5
minutes15
minutesIngredients
1/2 cup dark chocolate (chips or chopped)
3/4 cup peanut butter (smooth or crunchy – your choice!)
1/4 cup honey (for natural sweetness)
2–3 of your favorite protein bars (any flavor works!)
Optional: flaky sea salt (for that fancy finish)
Optional: 1 tbsp oil or butter (to help melt the chocolate smoothly)
Directions
- Chop-chop!
First, take your protein bars and chop them into small pieces about 1/8 of their size. You want them small enough to fit at the bottom of each section of your tray. - Tray time!
Drop one bite-sized piece of protein bar into each hole of your ice cube tray or mini muffin tin. - Peanut butter + honey = magic
Mix your peanut butter and honey in a bowl until it’s smooth and creamy. Pour a little of this mixture over the protein bar pieces in the tray. Fill each hole about halfway. - Chocolate top coat!
Melt your dark chocolate. (You can do this in the microwave in 30-second bursts or on the stove.) Add 1 tbsp of oil or butter to make it melt more easily. Once it’s nice and smooth, pour it over the peanut butter mixture in each section. - Finishing touch
Sprinkle a tiny pinch of flaky sea salt on top of each if you like a sweet-and-salty combo (it’s delicious!). - Freeze!
Pop the tray into the freezer for at least 2 hours, or until the bites are firm. Once they’re ready, you can pop them out and enjoy!
Notes
- Don’t skip the oil or butter when melting chocolate; it helps make the chocolate pourable and smooth.
- Be sure your peanut butter and honey are well mixed before pouring, or you’ll get uneven layers.
- Don’t overfill the tray sections. The fudge layers will stack better when there’s room for each!
- Freeze them long enough if they’re too soft, they’ll fall apart when you pop them out.


Serving Suggestions
- Eat them straight from the freezer for a cool, fudgy bite!
- Pack a couple in your lunchbox (keep cool with an ice pack).
- Crumble one over a bowl of Greek yogurt for a fun protein boost.
- Share them with friends after a workout or sports practice.
Fun Fact
Did you know dark chocolate is full of antioxidants? That means it helps your body fight off stress and feel great even though it tastes like a treat!
Conclusion
This high protein fudge is proof that healthy snacks don’t have to be boring. With its creamy peanut butter layers, rich chocolate topping, and protein-packed base, it’s a satisfying treat you can enjoy anytime. Whether you’re meal prepping snacks or craving something sweet, this high protein fudge recipe fits perfectly into a balanced lifestyle. Easy to customize, fun to make, and even better to eat—this is one dessert you’ll want to keep stocked in your freezer!